Cooking

Home Made Sausage by Admin

In 2012, I took one of the most fun and tastiest classes ever. Usually, when I think of class, the words fun nor tasty comes into mind.  However, this was a sausage making class with a beer tasting at the now defunct Living Social 918 F Street Building (RIP). It was taught by Kyle Bailey of Birch and Barley, who taught us how to make a breakfast sausage patty and also spicy sausage links. It was a great experience and one of my favorite cooking classes I've taken.

Fast forward to three years later. It's 2015, and in those three years, I haven't attempted to make a single sausage at all. This is mostly due to the fact that I didn't own any of the necessary equipment for it, which seems to be a pretty good reason. Well, it was finally time for a good reason to come. This past Christmas, I got my girlfriend, Vanessa, a KitchenAid Mixer.  Vanessa loves to cook, and I knew she would love it. But, maybe, it was subconscious gift for myself as well? It probably was, but she doesn't need to know. *Prepare for evil stare from, Vanessa.*

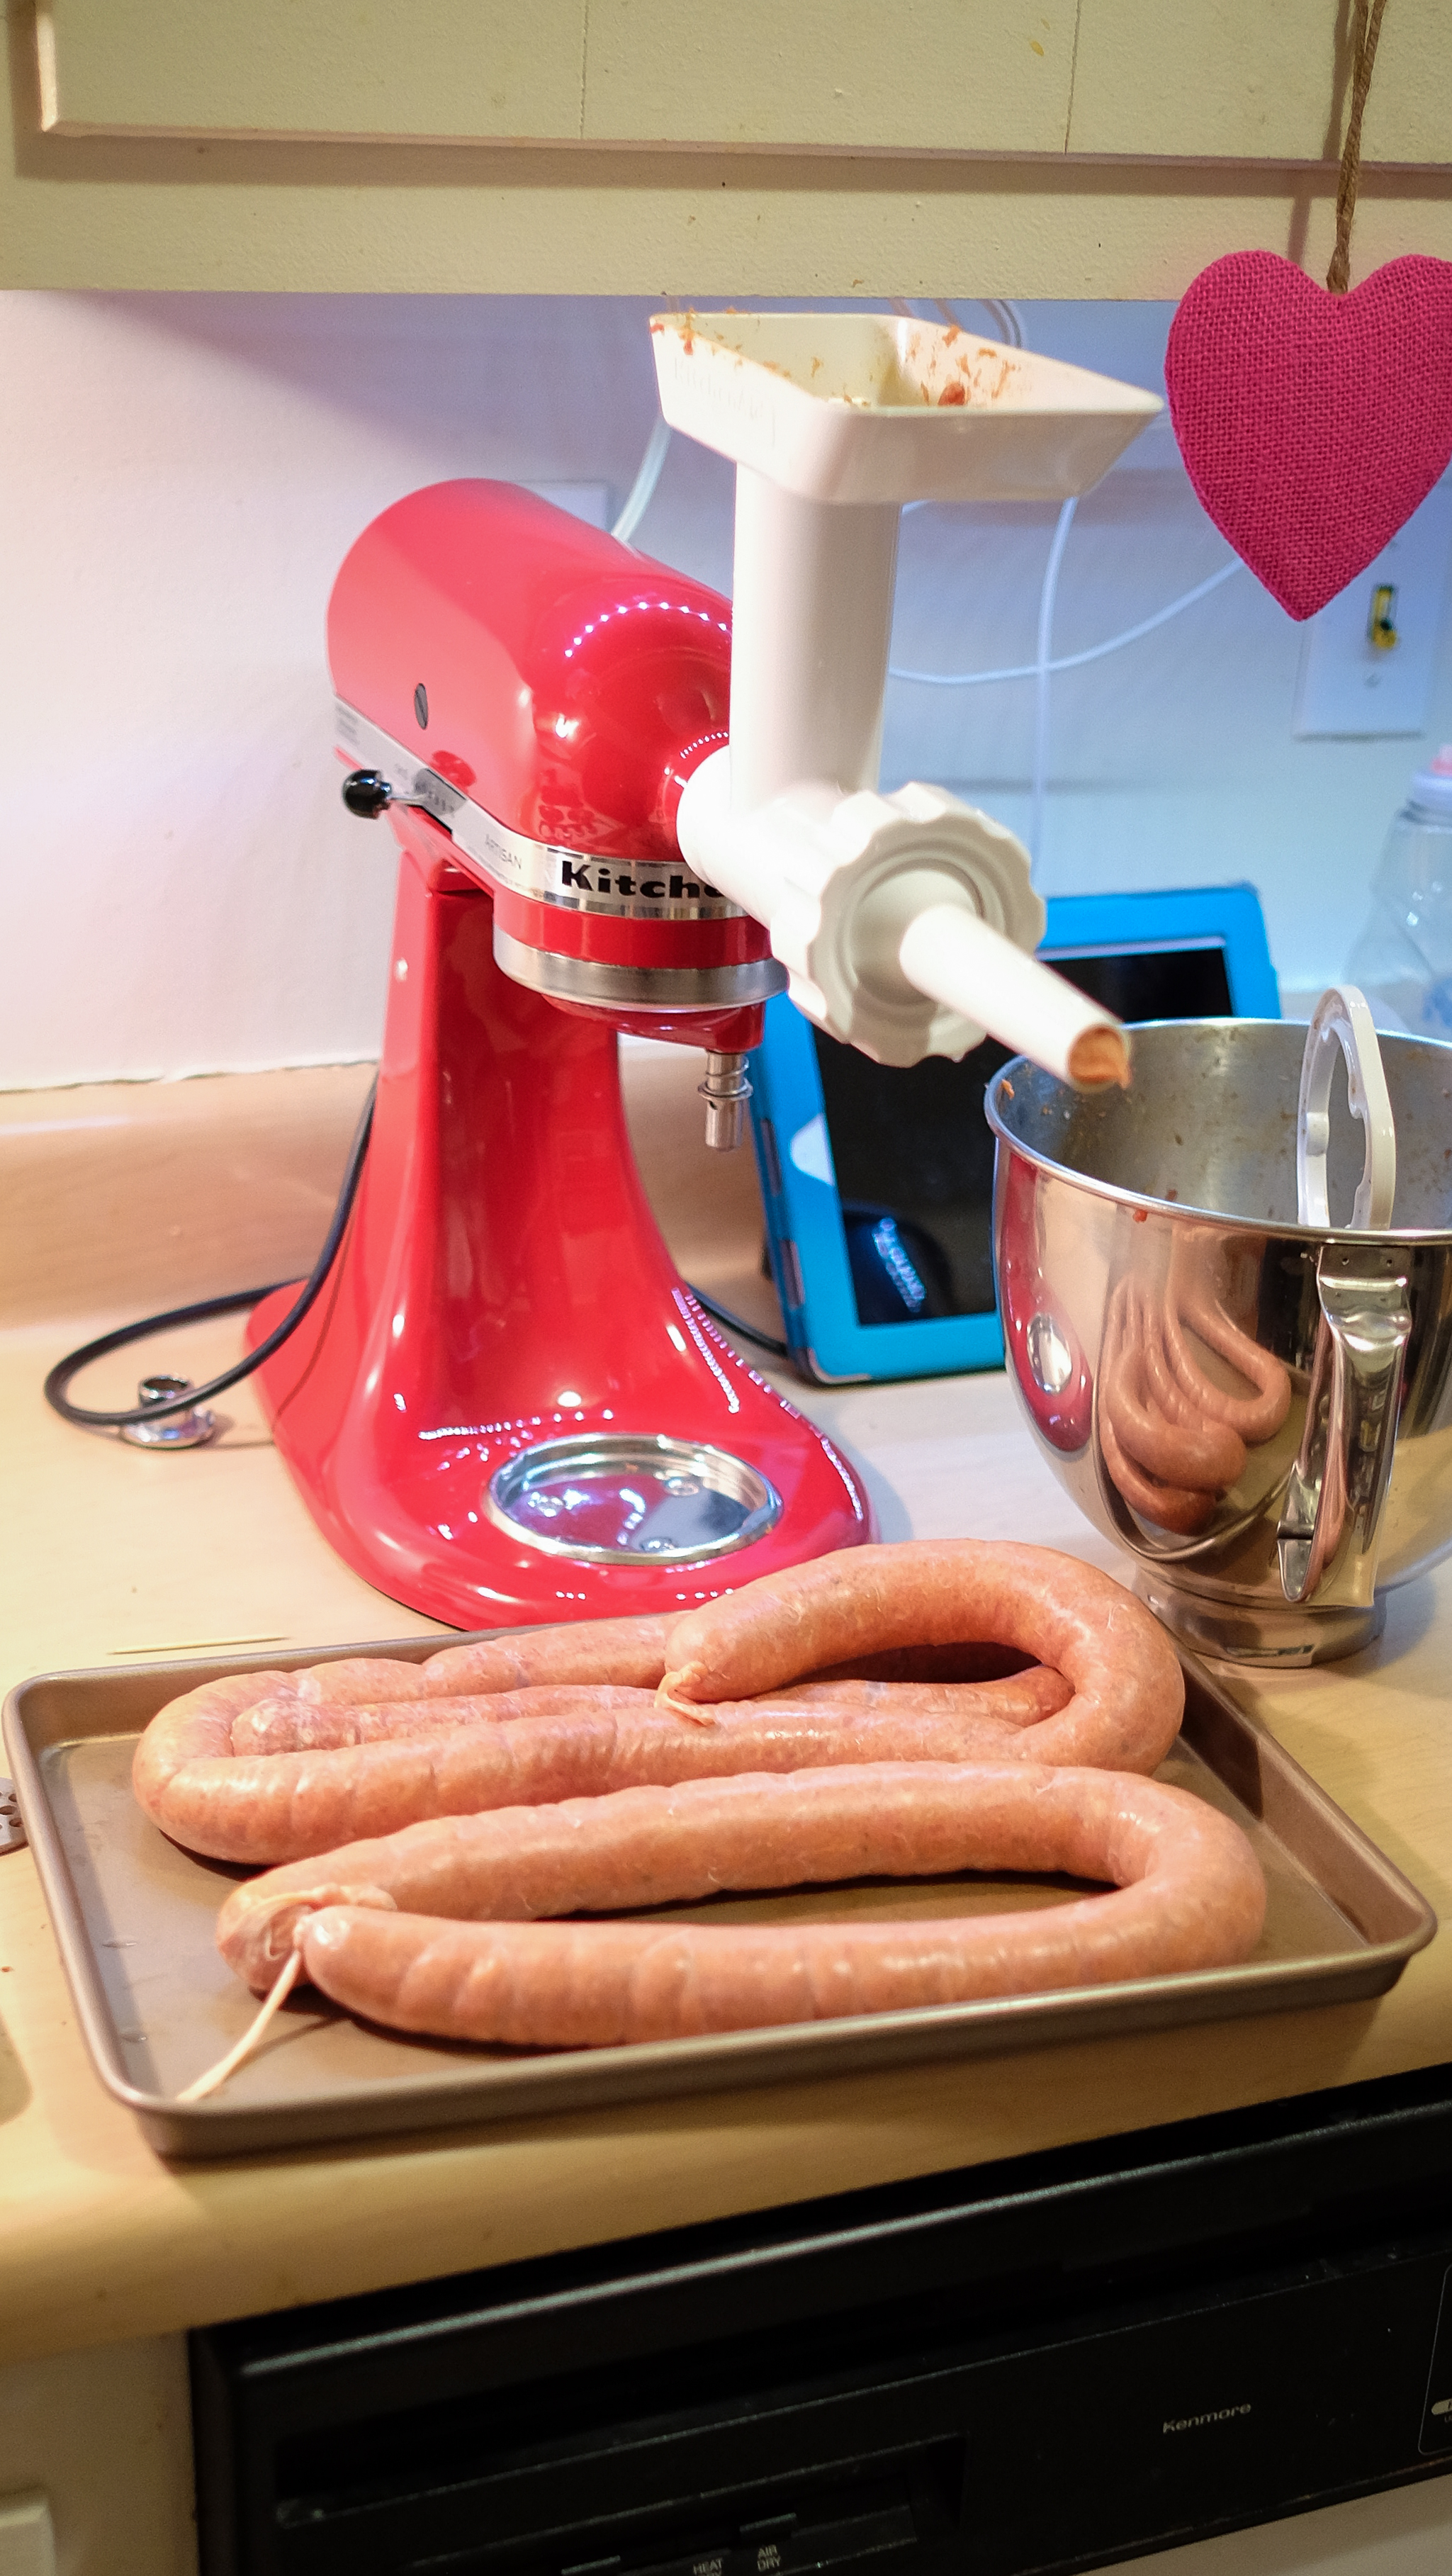
Shortly after purchasing the mixer, I decided to buy the attachments for it too.  I bought a KitchenAid mixer attachment pack from Amazon, which included a food grinder, slicer/shredder, and fruit/vegetable strainer, and also a sausage stuffer kit.  She knew that I had taken the sausage making class before, and started to look up some other recipes.  She found a spicy Italian sausage recipe from Bon Appetit with a handy video.  I didn't remember all the steps from three years ago, so the video was a great refresher. 

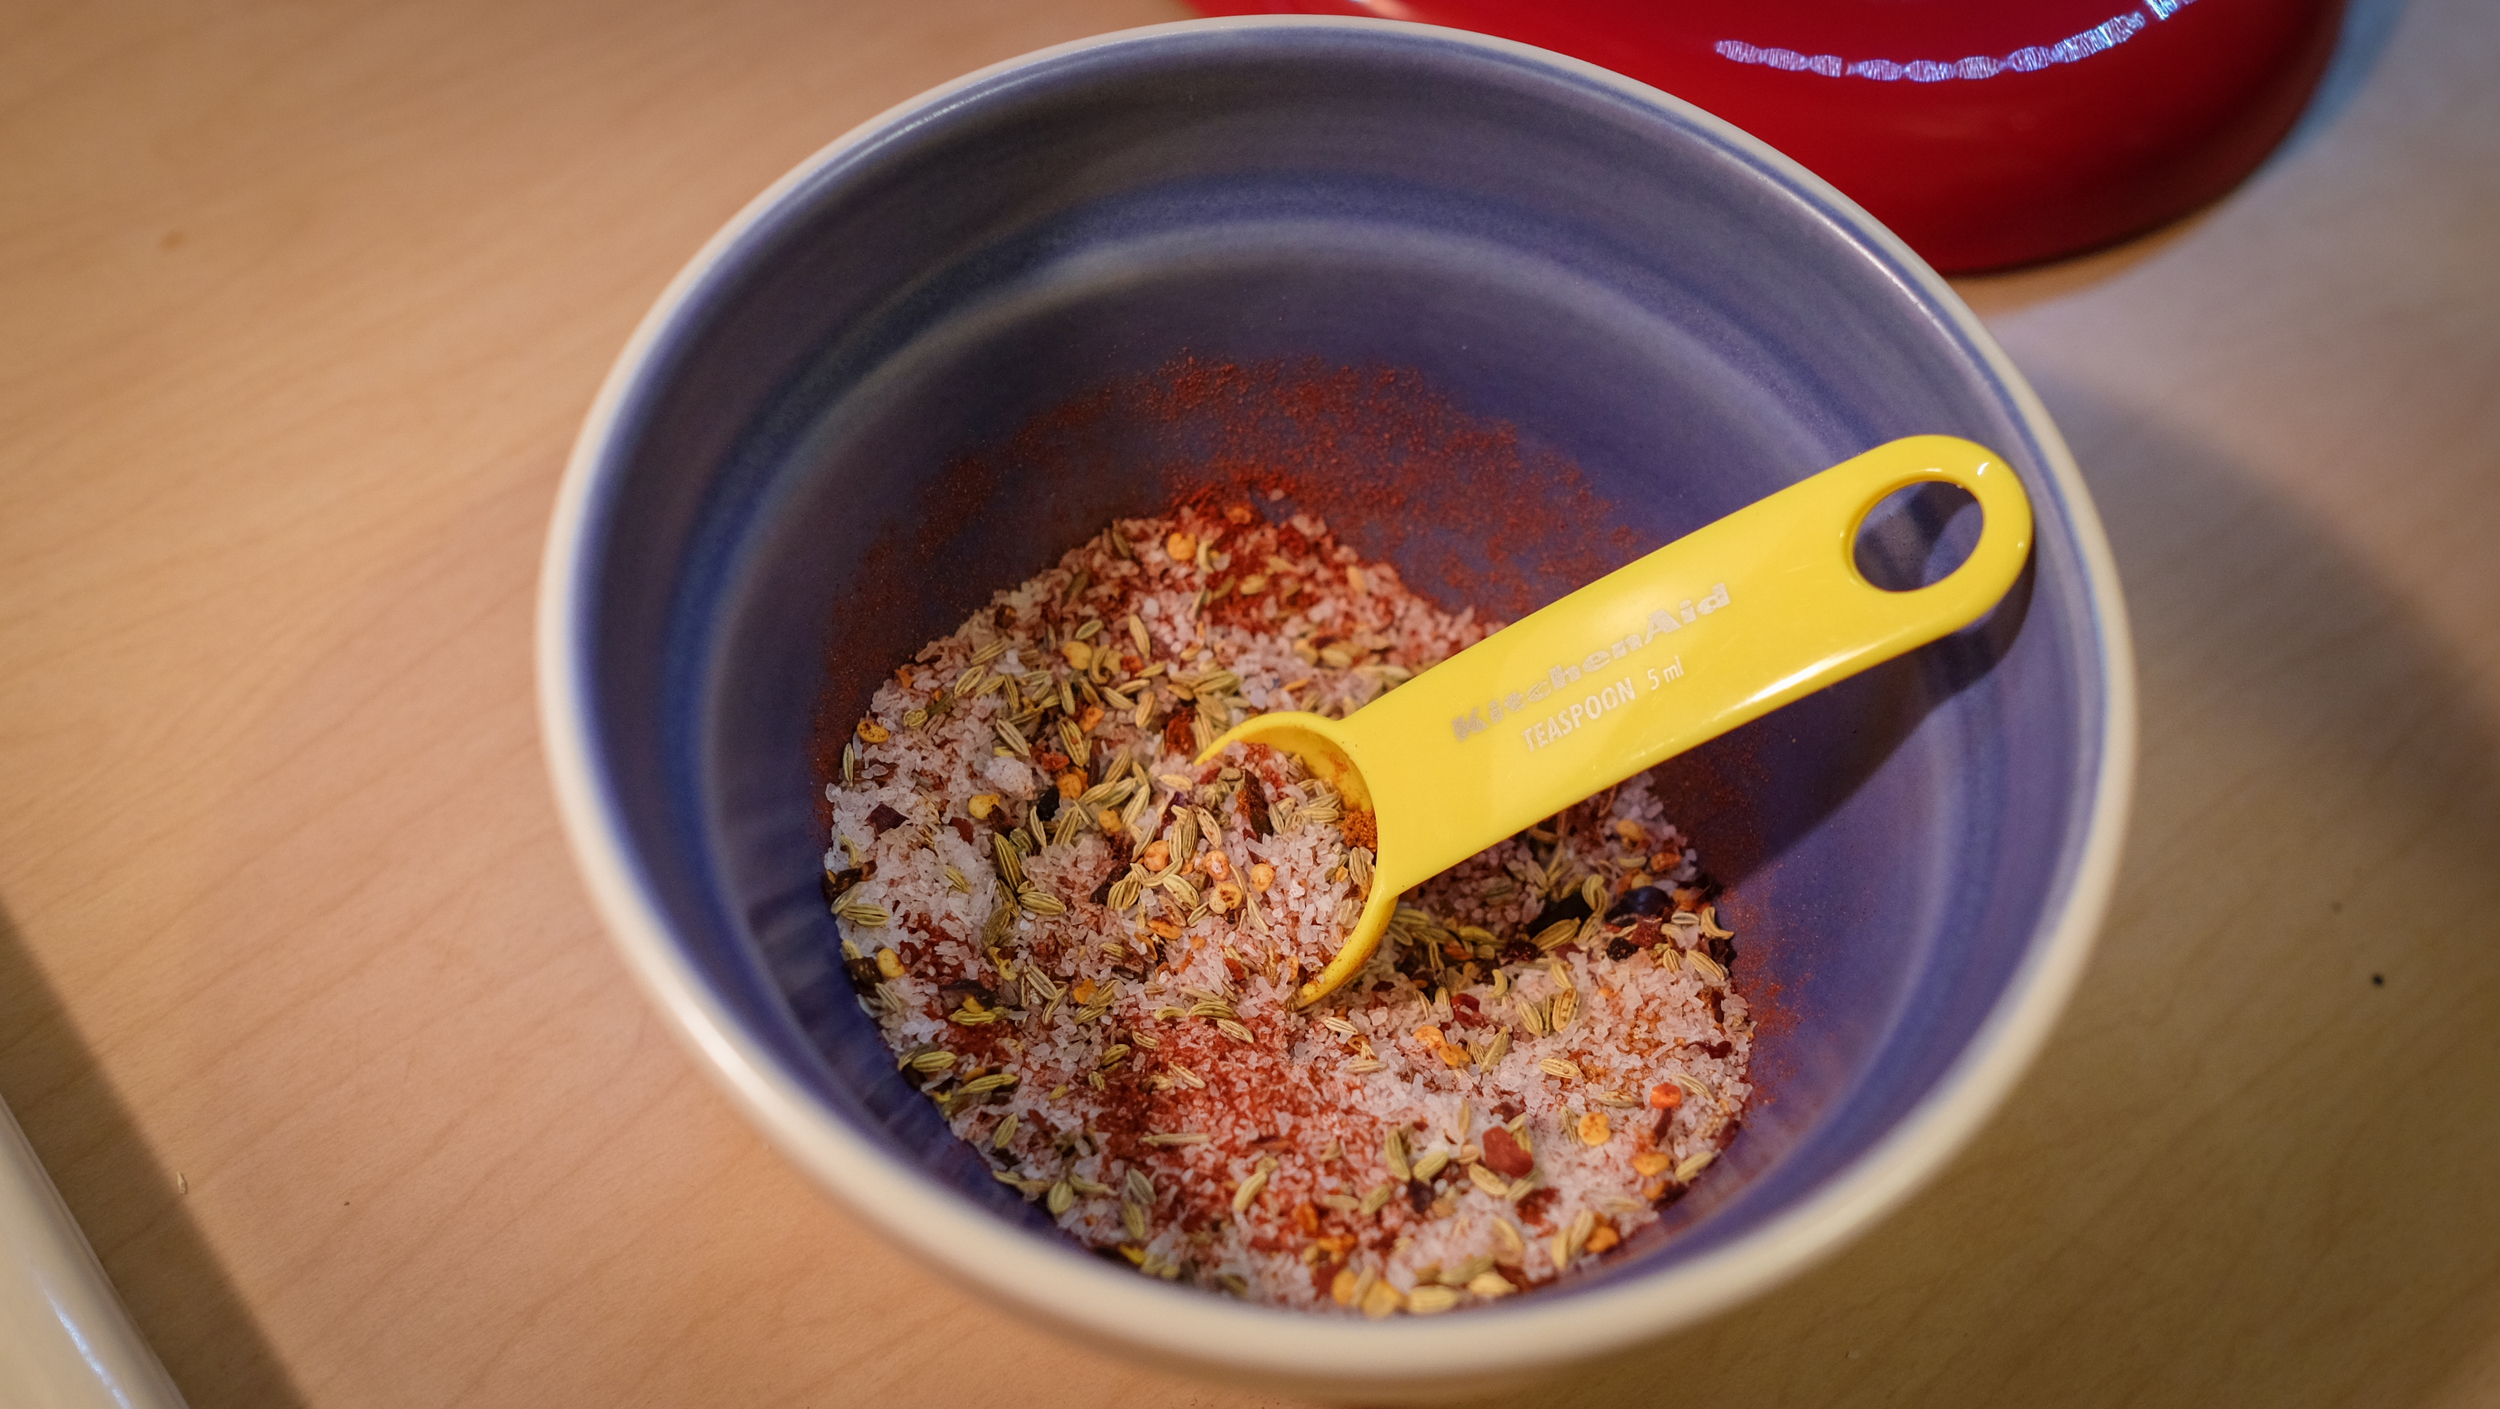
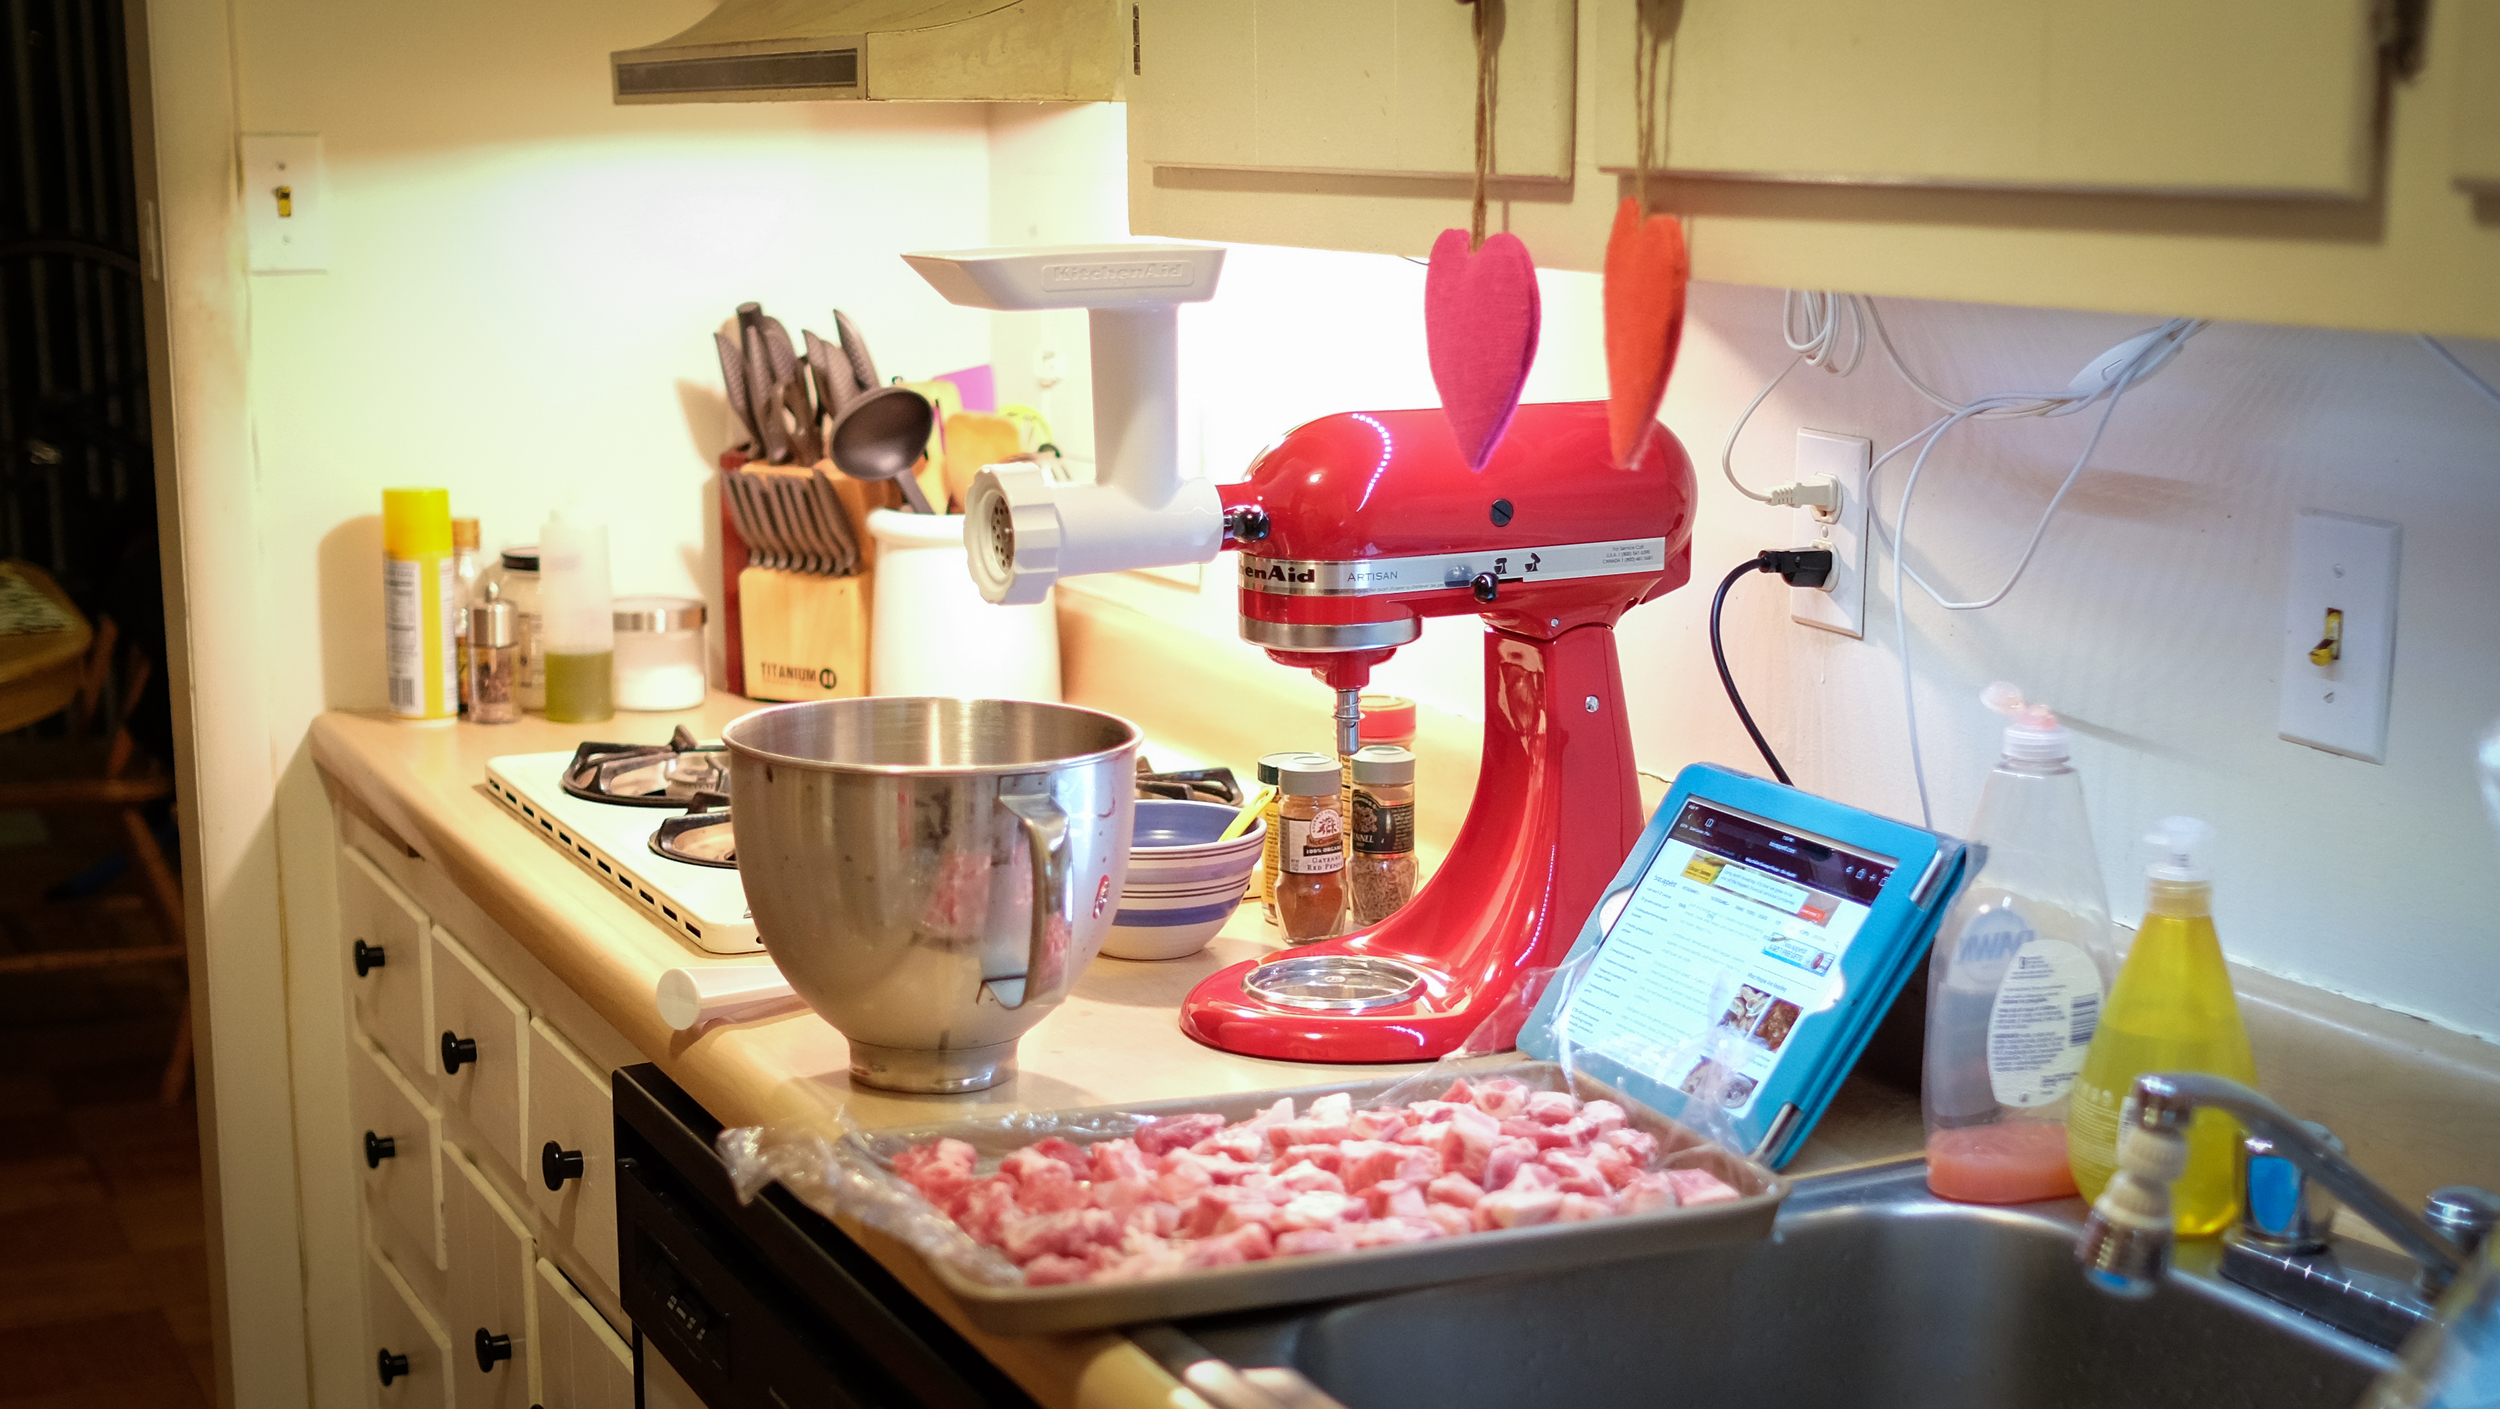
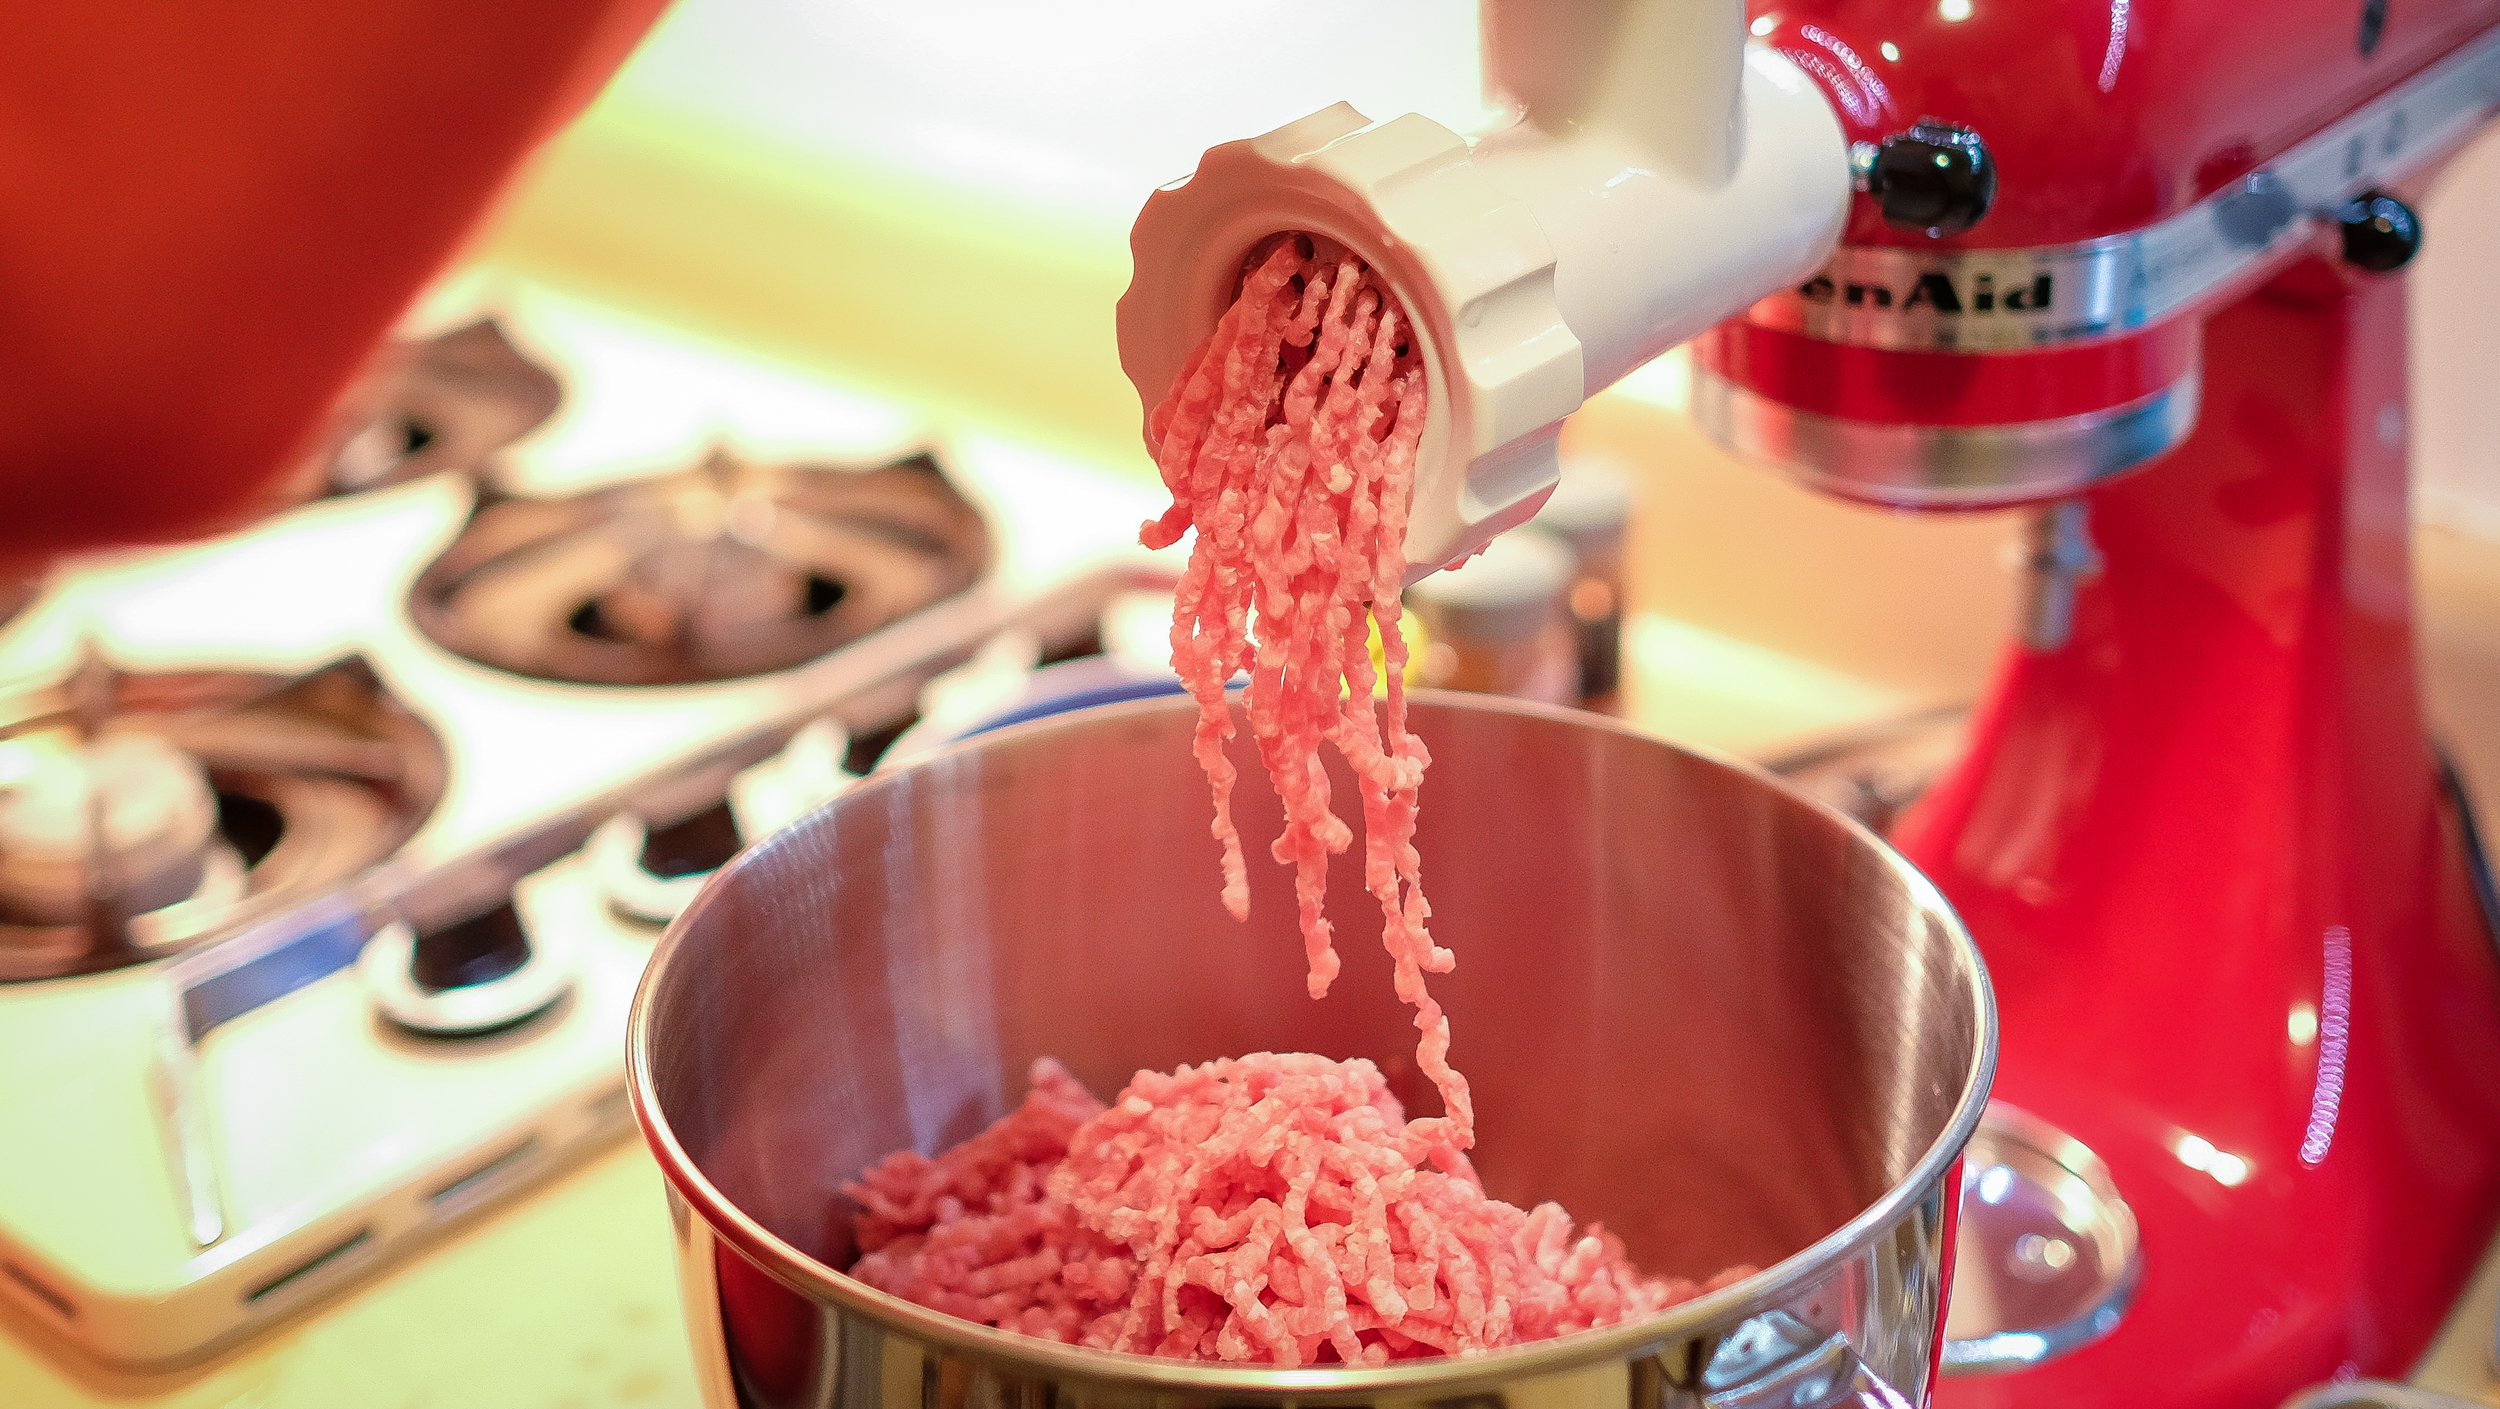
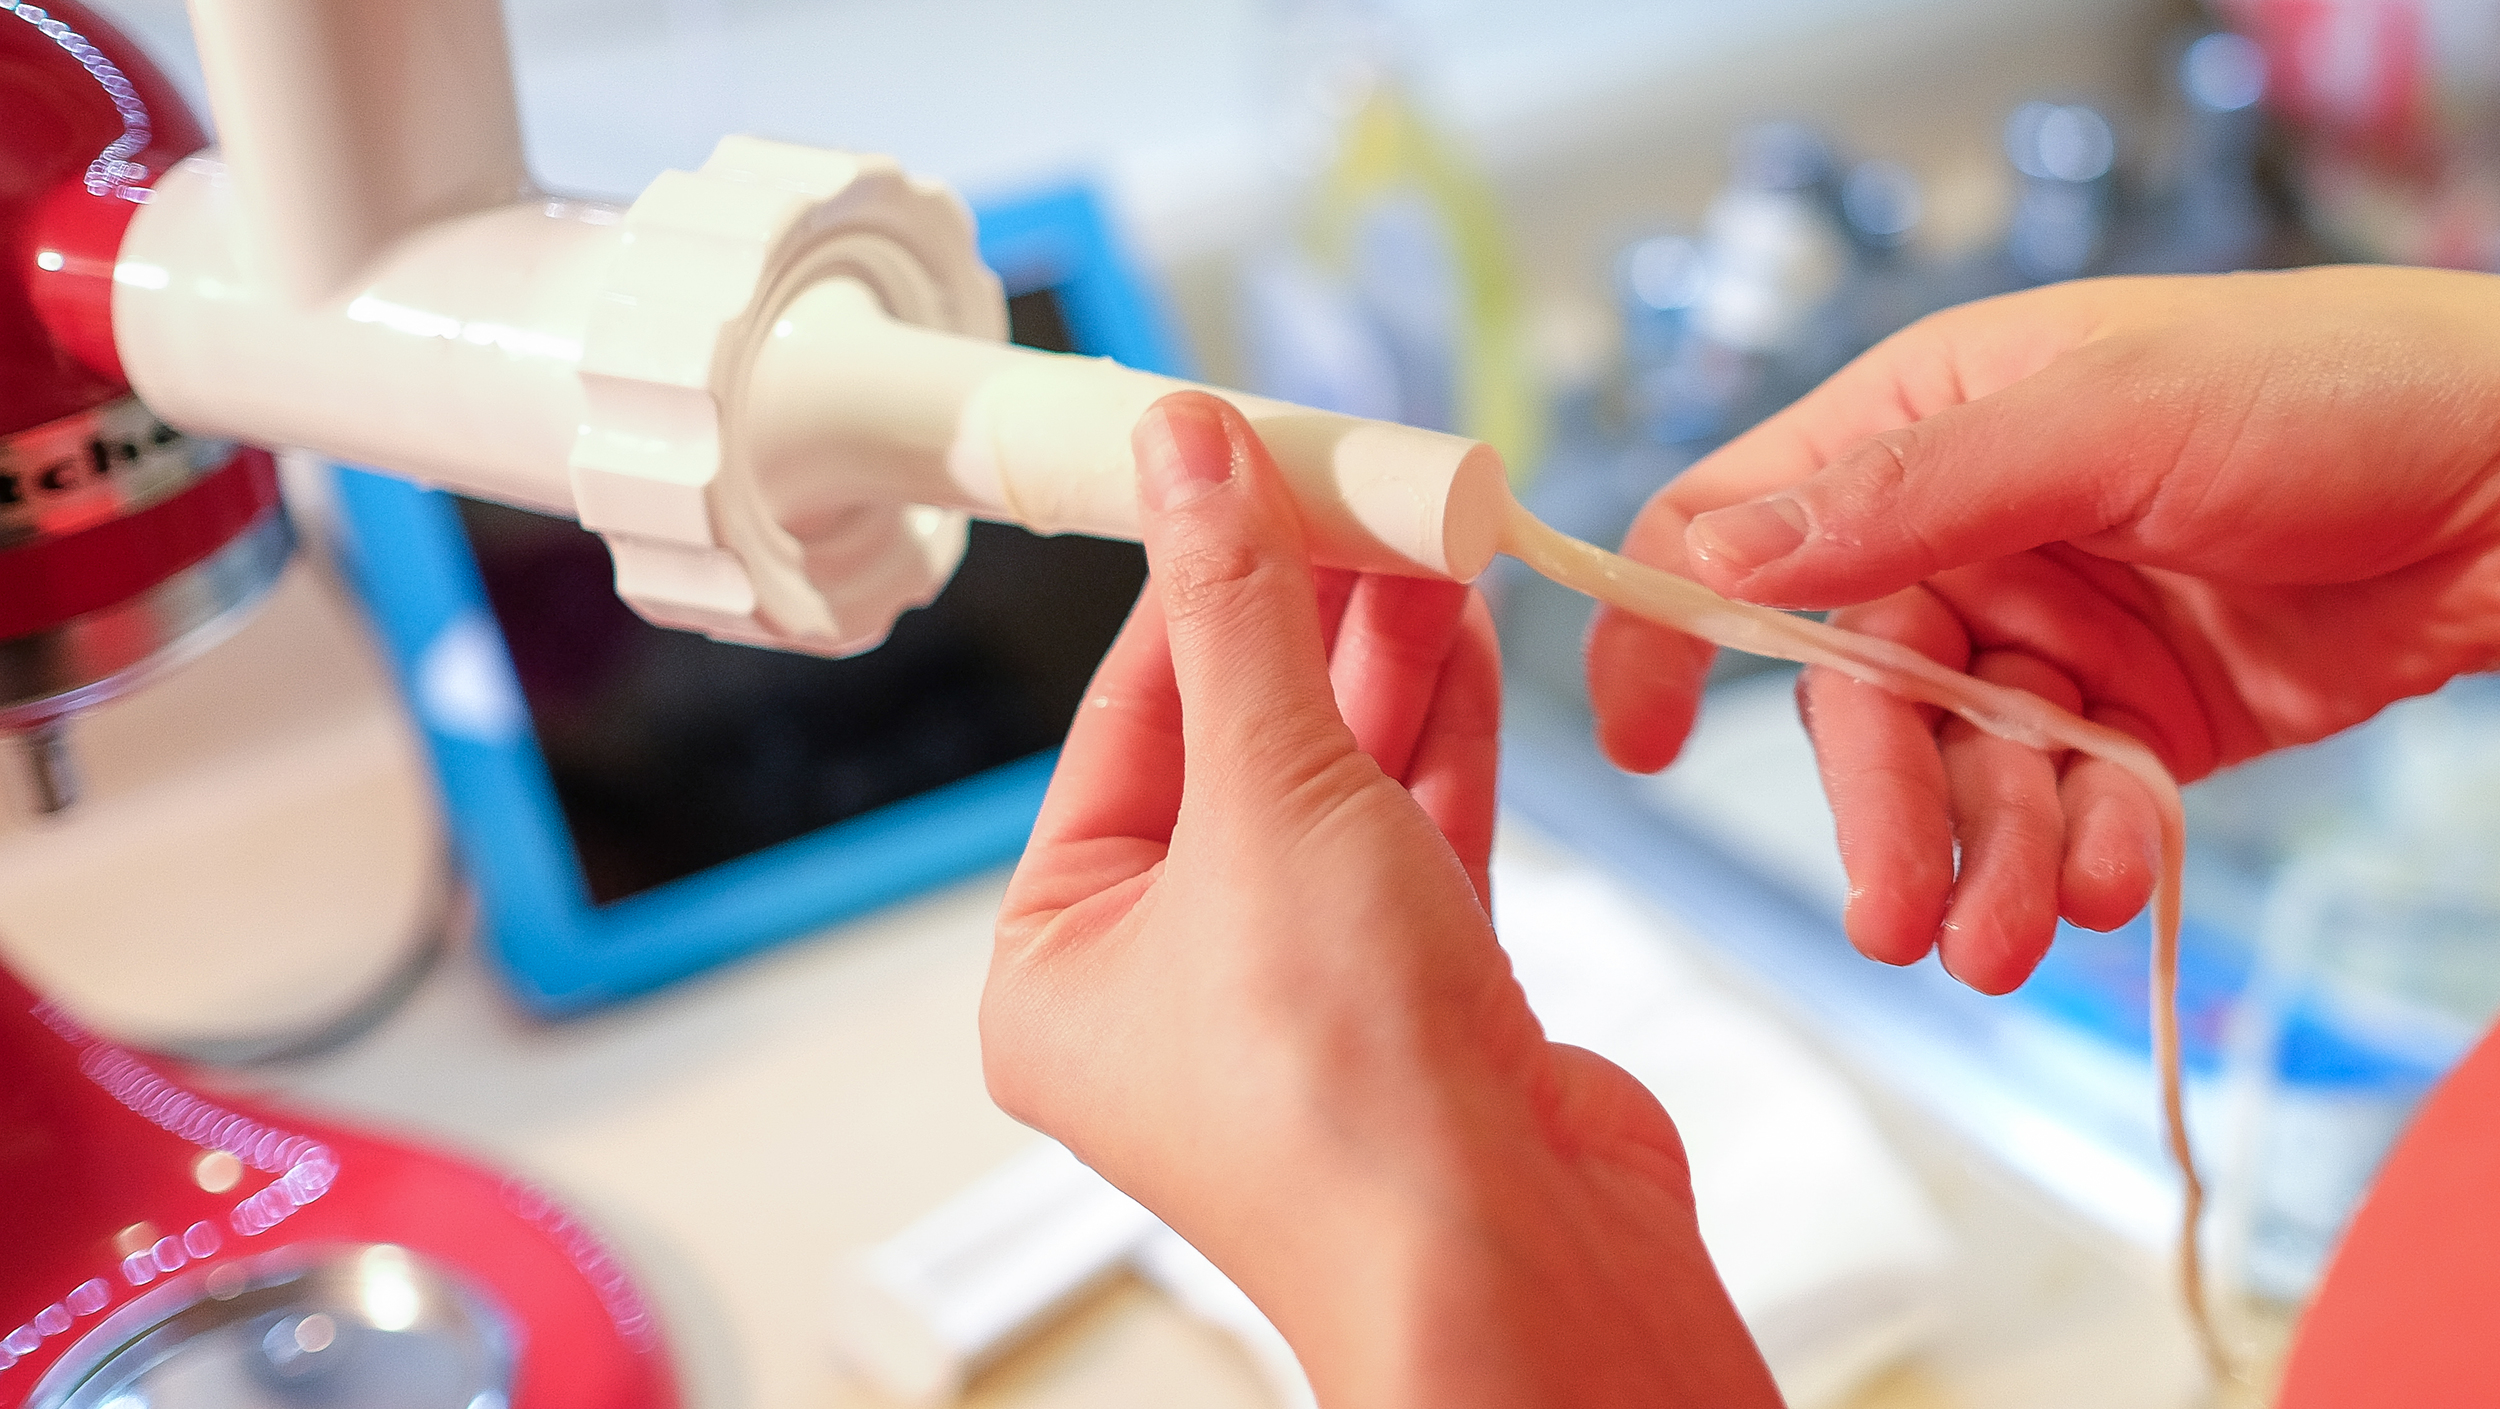
Vanessa bought all the ingredients necessary, and it was time to get started. I won't go over every step of the recipe, but here are some quick visual key points to the process.

So, here are some things that we learned.

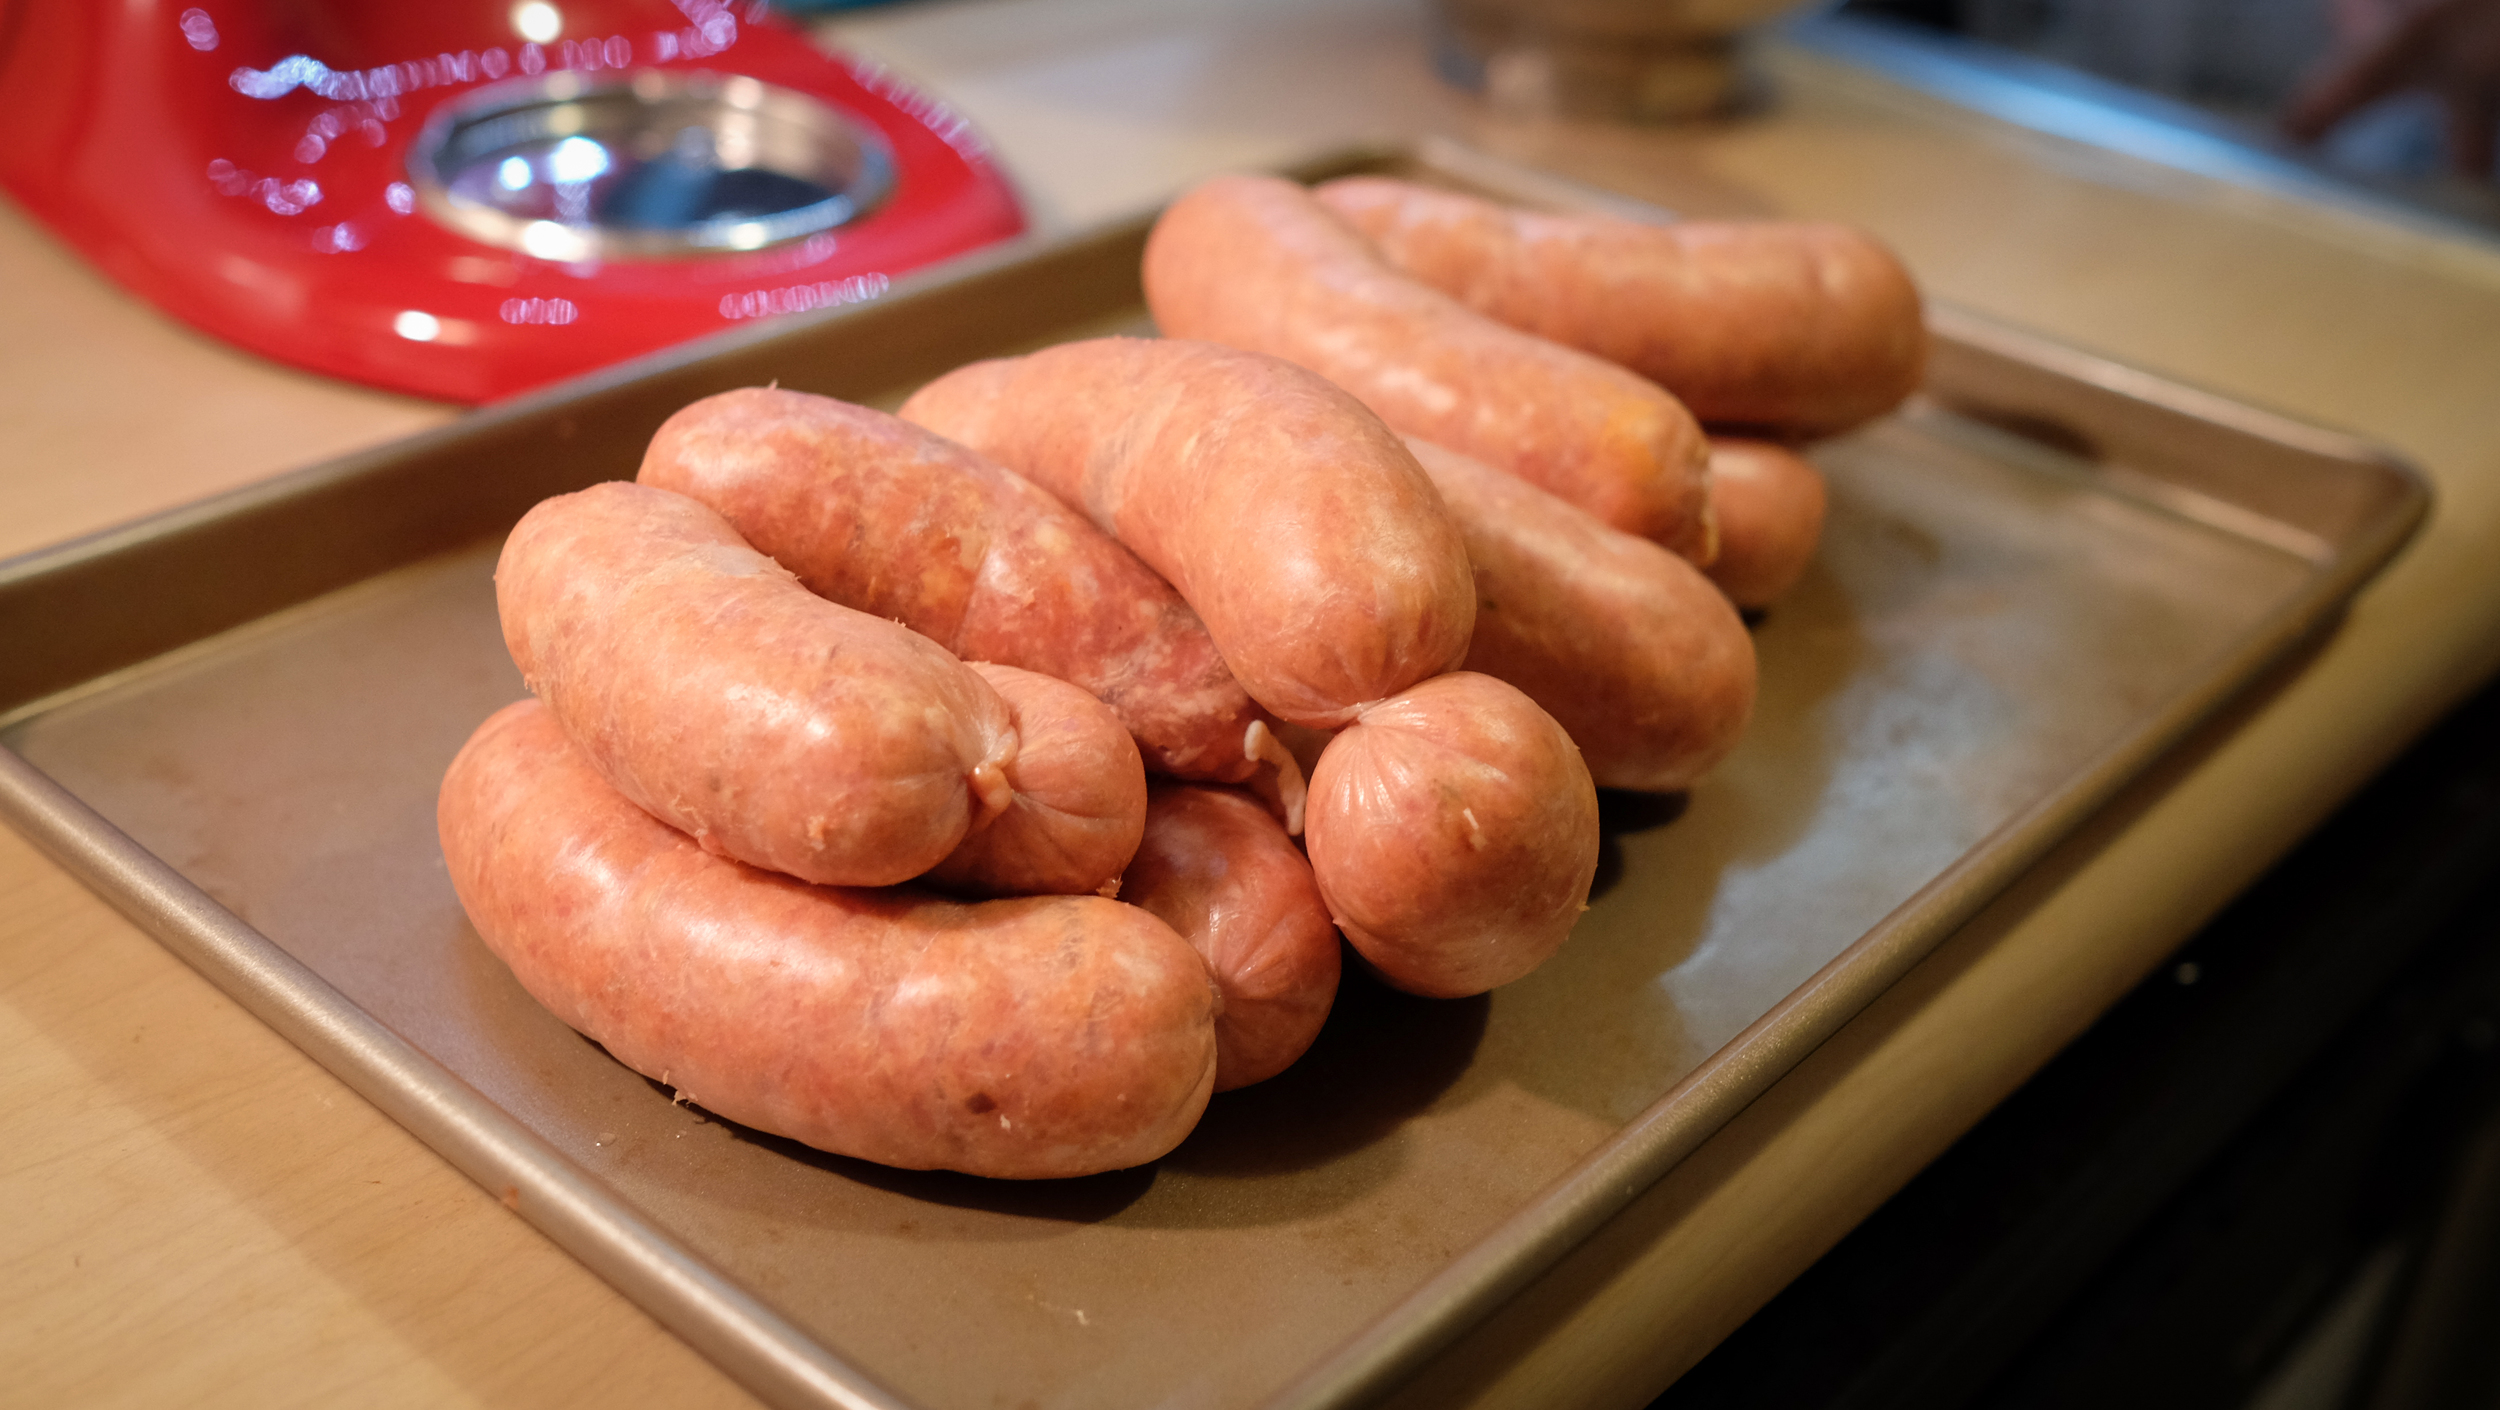
There was one time where the sausage bursted as we were stuffing it.  This was due to us not paying attention and it got over stuffed.  It was an easy fix, as we just had to remove the excess and tie off that link and start a new one.  So note to self, pay attention.

As I was twisting the sausage into smaller links, there were a couple of times where it bursted. There are a couple of reasons I can think of why it happened and how to fix it.  It could have been due to it being to thick due to over stuffing.  Also, it could have been due to not pricking the casings beforehand to relieve some pressure. So, for next time, we're going to try to make links that aren't too fat, and to twist them into links while it's still coming out of the stuffer instead of at the end.

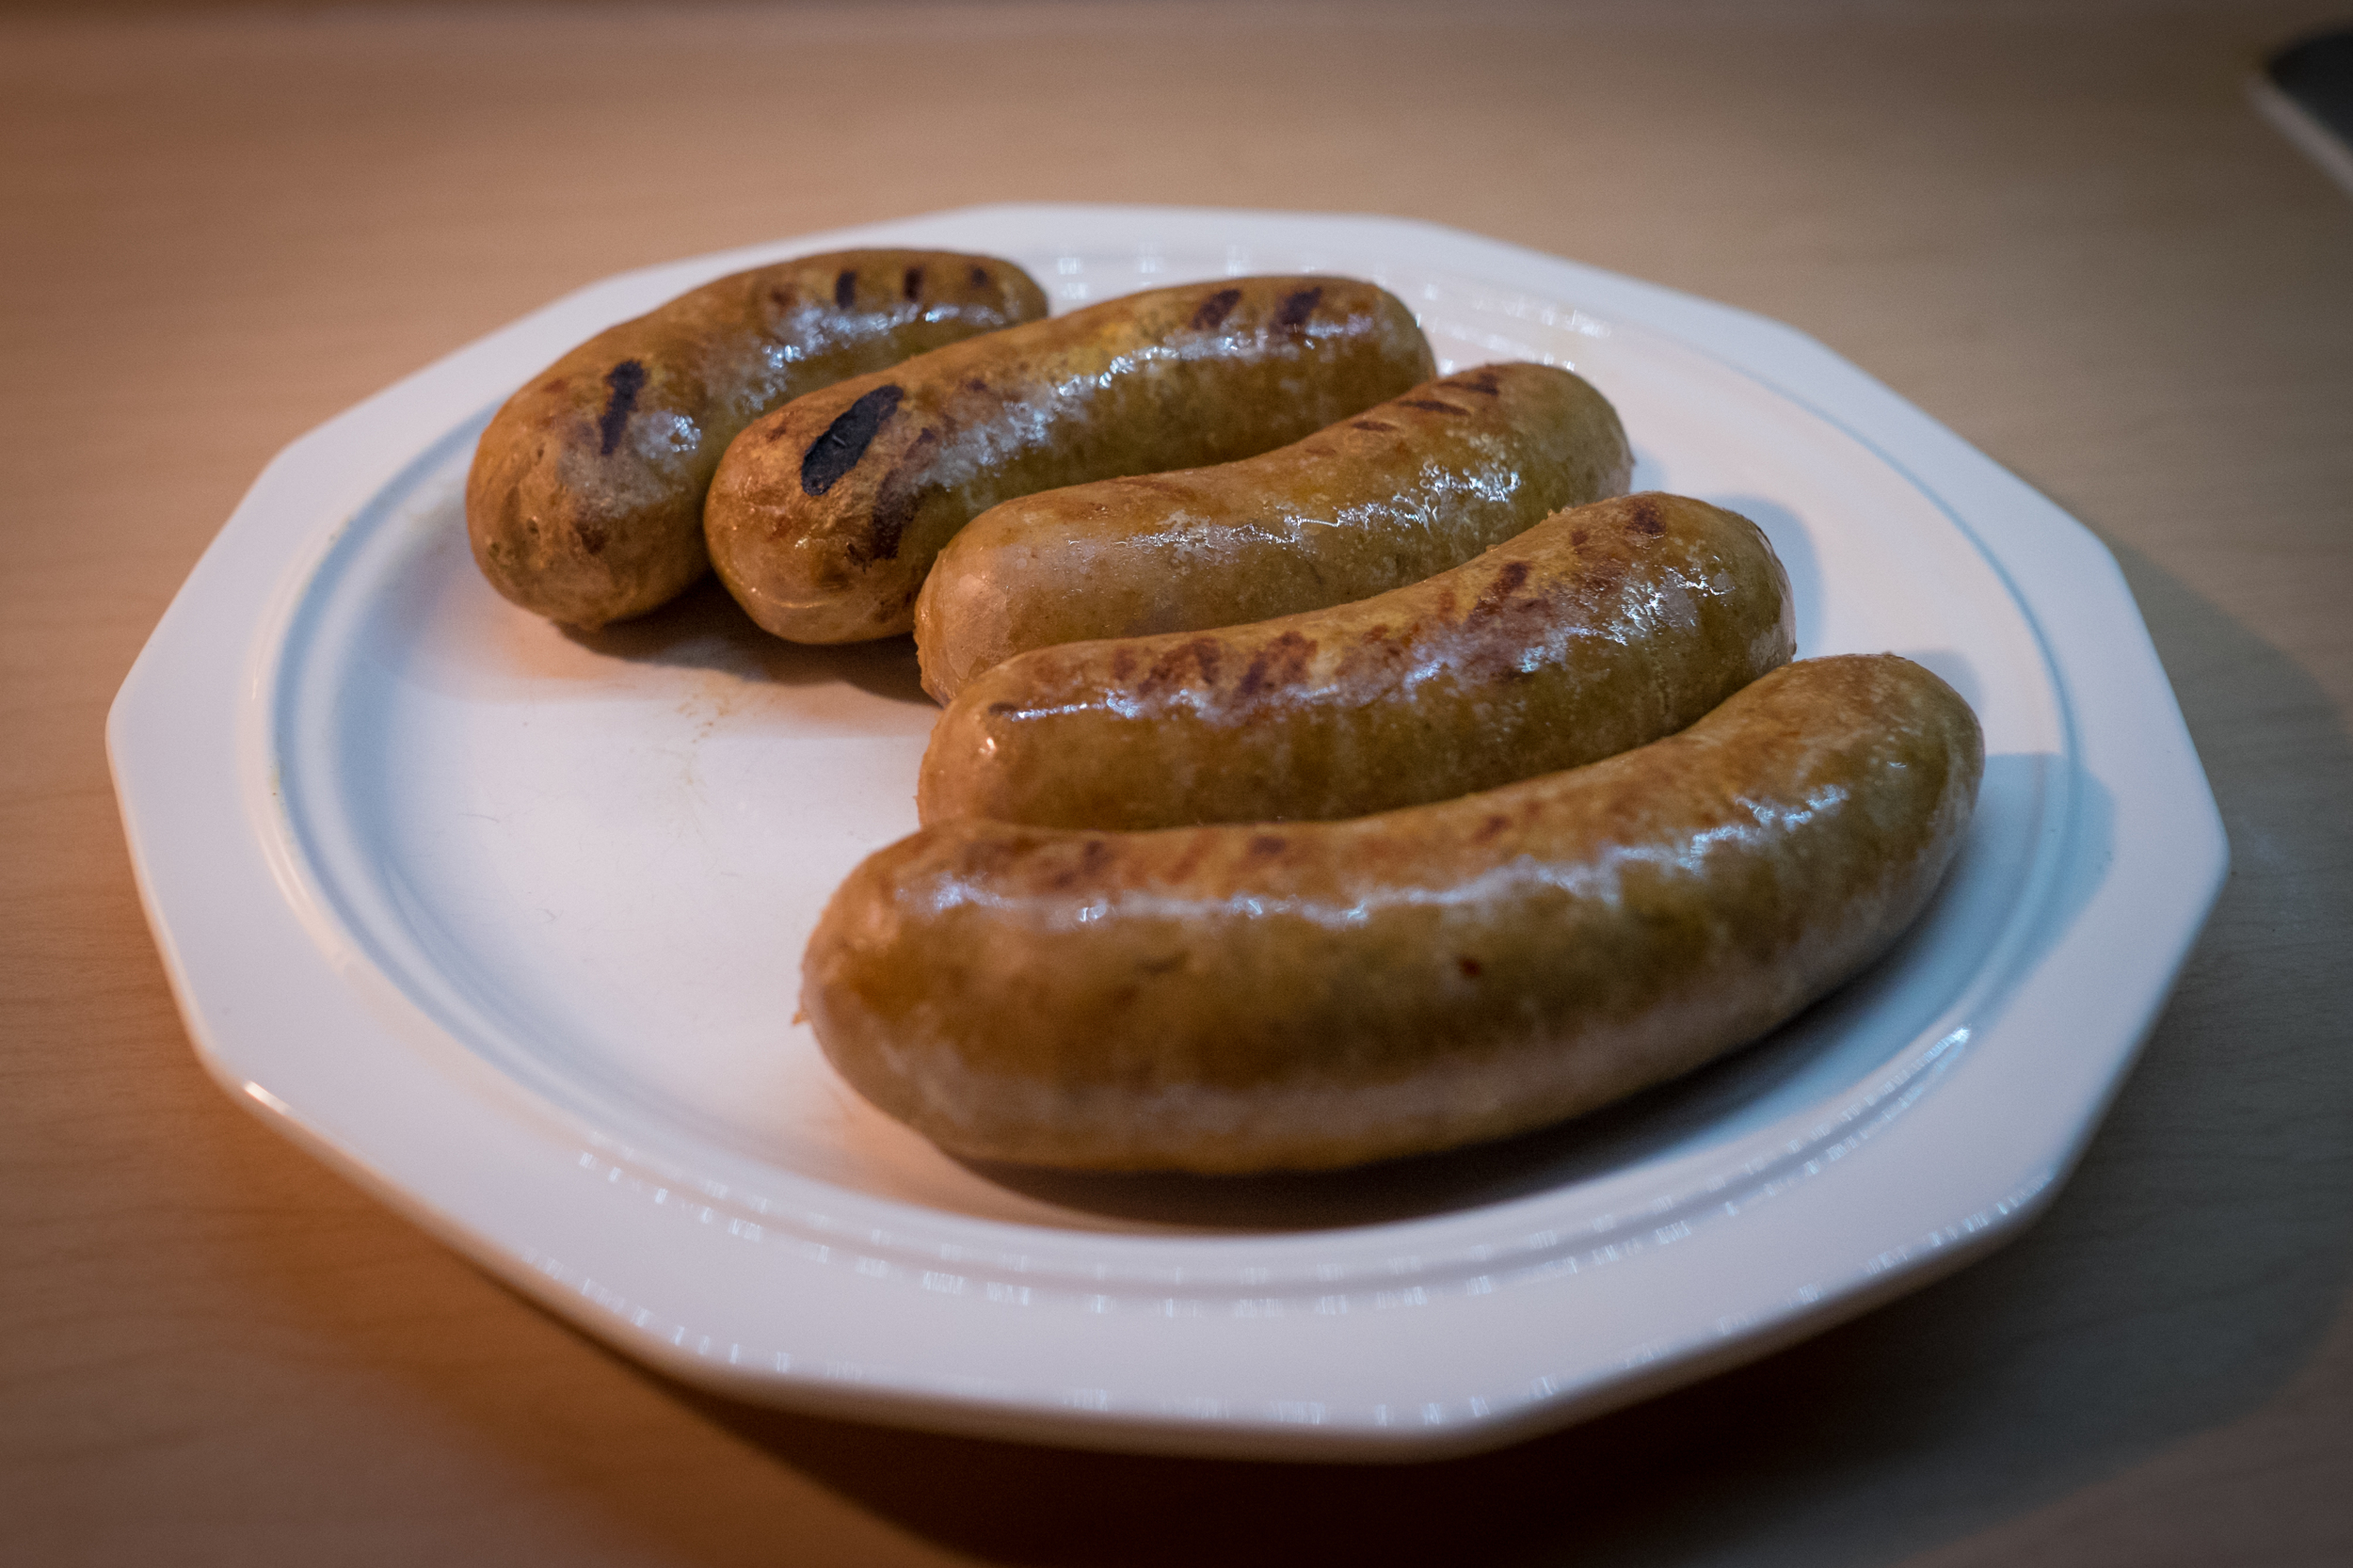
Overall, it tasted pretty great. The process was a little long, but I'm sure we'll be much faster next time.  We're already looking forward to cooking some new sausage recipes, and I'll keep you updated on what we're trying out.  So if you're attempting this for the first time, good luck and let me know if you have any questions.


Technolgy In The Kitchen by Admin

One of my goals this year has been to cook more often.  And so far, I've been doing well and really enjoying it.  It's relaxing, fun while learning new recipes, and challenges my creativity in the kitchen. And because I've been cooking more, I felt like I needed just the right gadgets to aid me in my journey.

So what gadgets have I invested in?  Nope, it's not a mixer or food processor or dehydrator. Actually, I did get all of the recently and it's been great.  But there are other gadgets that are way more important for me in the kitchen.  And thats.... wait for it..... Apple gear!

Ahhh yes, Tom the Apple nerd. One of the most recent things I've bought is the HoverBar for my iPad.  It's a flexible bar that can attach to the back of your computer or a kitchen counter or cabinet, and holds your iPad in the direction you may need.  I have my iPad hooked onto the HoverBar which is attached to my kitchen cabinet.

iPad 3 on a HoverBar

This setup is great whenever I need to follow a recipe via a youtube video I'm watching, a recipe app I'm using, or just when I need to jam out to some streaming music while cooking.  Which leads me to the next gadget, the Airport Express.

Apple Airport Express

An Apple Airport Express is a small device that can act as a router or even extend your wireless network.  It also has a USB port and a 3.5mm audio port where you can even connect speakers so they can be accessed wirelessly via Apple's Airplay.  I've had one for my bedroom speakers for awhile now, but recently picked up a couple more inexpensively on Craigslist.  I have that hooked up in my kitchen with just some basic speakers I got at Microcenter.

Basic speakers hooked up to my Apple Airport Express

So when I get home and start cooking and want to groove to some music, I just use my iPad or my iPhone and start streaming away.  I highly recommend creating an atmosphere where you can truly enjoy what you're about to be doing. This apple ecosystem has definitely been vital to my cooking journey. But if you don't have any of this, a good ole portable radio will easily do the job.  Be creative and have fun setting up your kitchen environment!

Spicy, Bacon, and Bulgogi Jerky, Oh My! by Admin

After making my first batch of home made beef jerky, I haven't stopped. That's probably because that batch was devoured so quickly! I've been experimenting with a couple of different flavors and have enjoyed each and every one of them so far. Here are my recent creations:

Spicy Alton Brown Beef Jerky

The first time, I used Alton Brown's beef jerky recipe and really enjoyed it. I decided to use it again but add a little spice to it.  Actually, when I mean a little, I meant a lot.  A few weeks back, my buddy Dan and I tried creating our own version of Andrea Nguyen's homemade chili garlic sauce recipe. It turned out way hotter then we expected, which was probably due to the thai chiles we were using.  I just added one spoonful of it to the marinade to add the extra kick!

Our homemade garlic chili sauce

Alton Brown's Beef Jerky Recipe with a spoonful of chili garlic sauce

The spicy Alton Brown marinated beef ready to be put on the dehydrator

The spicy Alton Brown beef jerky on the Nesco food dehydrator trays

Spicy Alton Brown Beef Jerky - All done!

This spicy beef jerky definitely had some kick to it.  After you eat a couple, the heat definitely builds up on your tongue.  Which makes it great for me, since I love spicy food.  

Bacon Jerky

Do you guys remember that commercial above? Well, that's pretty much an exact representation of my love for bacon. The only difference in that commercial and reality is that I'm human, I can read, and I will not accept substitutes for bacon! After making my first batch of beef jerky, it got me wondering... is it possible to make bacon jerky?  Why don't I see it really in the stores at all?  Well, I did some research and found that bacon jerky typically doesn't have a long shelf life due to the high fat content.  It usually goes bad quickly or it's been heavily preserved.  I did find some results of people successfully creating bacon jerky.  The interesting thing I learned was that it takes a LONG time to make it.  Beef Jerky usually takes 3-6 hours, just depending on the thickness of the cuts you make on my food dehydrator. From user experiences, they were stating it took 24-36 hours!  

I decided to give it a try.  I had some all natural, uncured center cut bacon from Whole Foods and gave it a shot. I didn't add anything to it and just laid it out on the trays and started to dehydrate it.  

Bacon slices on the food dehydrator

Dehydrating the bacon with a Nesco Food Dehydrator

After about 6 hours, I observed that it did shrink a little bit and was dripping fat like crazy.  I decided to try out a little piece of it and found out that not only was it not done, but it also tasted pretty bland. The fatty part of the bacon just tasted like flavorless oil. So then, I decided to add some kosher salt to it.  After about 24 hours, the bacon jerky was done.  It was crisp, and the added salt made the bacon jerky taste much better.  Was it worth it? Probably not.  However, I only say this in terms of just regular bacon jerky. The flavor just tasted too similar to baking some bacon.  But, this process gave me some hope for future creations.  I think I'll to create a maple glazed/salt bacon jerky next time. 

Bacon Jerky!

Bulgogi Beef Jerky

For this attempt, I decided to use a recipe that I've tried in the past for real Korean bulgogi.  I found the recipe from the Savory Sweet Life website by Alice Currah. Here it is:

Ingredients

  • 1-1.5 lbs. of thinly sliced rib-eye steak purchased from a Korean market. Or you can slice your own rib-eye or sirloin steak across the grain in paper thin slices. Partially freezing the beef helps with cutting clean slices.
  • 1/3 cup of soy sauce or for a Gluten-Free variation, use San-J Organic Tamari Wheat Free Soy Sauce found in the health food section of your local grocery store.
  • 3 Tbl white sugar
  • 1 Tbl sesame oil
  • 3 cloves of garlic, minced
  • 1/4 of a medium yellow onion, halved and sliced into medium moon shaped slivers
  • 2 green onions including the white parts, finely sliced into small pieces
  • 2 Tbl toasted sesame seeds
  • 1/4 tsp of red pepper flakes
  • 2 pinches of black pepper
  • optional 1/4 tsp. of ginger, finely minced

Instructions

  1. Whisk all the ingredients together in a medium bowl except beef and onions. When most of the sugar has dissolved, add beef and onion slices to the bowl and massage the marinade with your hands into each slice of beef. Cover and refrigerate for 1 hour. To pan fry, place a few slices of beef in single layers and completely flat on a hot oiled frying pan and fry each side until cooked. Some people prefer to cook the bulgogi until some of the edges have turned dark brown and crispy. Serve with a bowl of hot rice. Enjoy!

Using Savory Sweet Life's recipe for the Korean bulgogi marinade

The meat added to the bulgogi marinade.

Bulgogi Beef Jerky, ready to  be dehydrated!

The final product! Korean Bulgogi Beef Jerky!

This was quite tasty!  I was really happy with the result, and you can bet that I'll be making more of this in the future! I hope you guys give it a try, and let me know how it turns out. Now, it's time to think of some future beef jerky concoctions!

Cooking With Kunal: Cheesy Vegetarian Risotto by Admin

Cooking with Kunal Desai

The title of this post sounds like a new show on the food network, doesn't it?  Well, maybe one day. Kunal is my Indian brother from another mother, and we met when we were both fellow assistant hip hop instructors for our friend Amina, who owns District Groove.  Ever since then, we've been known to bust a move on a dance floor or two, and just hang out when we get the chance.

Interestingly enough, Kunal lives about 10 minutes from me, yet we only see each other every once in awhile. We decided to figure a way to get together more, and at the same time, enhance our awesomeness skills.  That's right, awesomeness.  So, we've decided to take on cooking.  There's one catch though.  He's Vegetarian.  And if you know me, I... am not, but of course, I can eat anything vegetarian friendly.

We figured it would be easy to pick up some cuisines where meat was optional.  First up, Italian!  The recipe we decided to try was a cheesy vegetarian risotto.  The recipe pretty much derived from Rachel Ray's Green Risotto Recipe. The only thing we did was change out the vegetables of our choosing, which were tomato, broccoli, and a green bell pepper. Here is the original recipe

Ingredients

  • 2 cups water
  • 1 quart vegetable stock
  • 2 tablespoons extra-virgin olive oil, 2 turns of the pan
  • 1 tablespoon butter
  • 1 medium onion, finely chopped
  • 2 cups arborio rice
  • 1/2 cup dry white wine or dry sherry
  • 1 pound triple washed spinach, chopped
  • 1 cup loosely packed basil leaves, chopped or torn
  • 1/2 cup flat-leaf parsley, a couple of handfuls, chopped
  • Coarse salt and freshly ground black pepper
  • 1/4 teaspoon nutmeg, grated or ground
  • 1/2 to 2/3 cup grated Parmigiano-Reggiano, 2 or 3 handfuls

Directions

Bring water and stock to a boil, then reduce heat to low to keep warm.

In a large skillet, heat oil and butter over medium to medium high heat. Add onions and saute 3 minutes. Add arborio rice and saute, 2 or 3 minutes more. Add wine or sherry and allow liquid to absorb, 1 minute. Add 1/2 the stock or broth and reduce heat slightly. Simmer, stirring frequently until liquid is absorbed, then add more liquid, a few ladles at a time. When liquid cooks out, ladle in a bit more.

When risotto has cooked almost to al dente, about 18 minutes, fold in spinach, basil and parsley. Season risotto with nutmeg, salt and pepper and stir in any remaining broth. Risotto will cook 22 minutes, total. Stir in cheese and serve immediately.

Here are some photos of our process and the final result.  It turned out great and I'm looking forward to the next edition of, Cooking With Kunal.

Kunal slicing tomatos, and hopefully not a finger.

Tomatos, green peppers, and broccoli prepped and ready

Getting the pan ready with some butter and olive oil

After we sautéed the onions, we added the arborio rice

After letting the arborio rice soak up the wine we added, it was time to add the vegetable broth.

The vegetables were added towards the end, right before the final ladles worth of broth were about to poured in.

Adding some freshly grated parmesan cheese on top

Vegetarian Cheesy Vegetable Risotto Ready To Eat!

Home Made Beef Jerky by Admin

Recently, I've had this desire to do more things with my bare hands.  From fixing things to cooking things from scratch.  Maybe it's a primal instinct that has taken over my mindset.  I'm not sure the reasoning, but I like it!

One of the things I've always wanted to do was to create my own beef jerky. Besides eating my favorite packaged beef jerky from Wild Bill's, I grew up loving the home made beef Jerky from Laudermilch's in my hometown! It was fresh, tender, and of course, delicious.

I decided it was finally time to give it a try, and bought a food dehydrator.  I looked up a couple of different recipe's, but I decided to try out Alton Brown's recipe.  Here it is:

Ingredients

  • 1 1/2 to 2 pounds flank steak
  • 2/3 cup Worcestershire sauce
  • 2/3 cup soy sauce
  • 1 tablespoon honey
  • 2 teaspoons freshly ground black pepper
  • 2 teaspoons onion powder
  • 1 teaspoon liquid smoke
  • 1 teaspoon red pepper flakes
  • Special Equipment: 1 box fan, 4 paper air-conditioning filters, and 2 bungee cords

Directions

Trim the flank steak of any excess fat, place in a zip-top bag, and place it in the freezer for 1 to 2 hours in order to firm up.

Remove the steak from the freezer and thinly slice the meat with the grain, into long strips.

Place the strips of meat along with all of the remaining ingredients into a large, 1-gallon plastic zip-top bag and move around to evenly distribute all of the ingredients. Place the bag into the refrigerator for 3 to 6 hours.

Remove the meat from the brine and pat dry. Evenly distribute the strips of meat onto 3 of the air filters, laying them in the grooves and then stacking the filters on top of one another. Top these with 1 empty filter. Next, lay the box fan on its side and lay the filters on top of it. Strap the filters to the fan with 2 bungee cords. Stand the fan upright, plug in and set to medium. Allow the meat dry for 8 to 12 hours. If using a commercial dehydrator, follow the manufacturer's directions.

Once dry, store in a cool dry place, in an airtight container for 2 to 3 months.

Alton used a fun method of a box fan and air filters, but I used my dehydrator.  Anyways, here are some photos of my process.

The marinade

Freezing the flank steak for easier slicing.

The flank steak sliced up!

The flank steak in the marinade

The flank steak after being marinated over night.  

Removing the excess marinade via a colander.

The meat on the Nesco food dehydrator trays

The Nesco food dehydrator on!

The beef jerky all done!

The beef jerky came out pretty well for my first try. The thinner pieces were done in 3 hours.  The thicker cuts took about 6 hours.  I enjoyed the flavor and tasted the worcestershire sauce a little more then I thought I would.  Also, I decided to not cut the excess fat, only because I knew I would be devouring the beef jerky quickly.  It was pretty delicious! All in all, it was a fun, easy, and a long process. I'm excited to try out a couple different marinades in the future.  Perhaps a fun Vietnamese Thit Bo Luc Lac or a Korean Bulgogi marinade... or perhaps a spicy one!  I'll post about those experiments in the future!